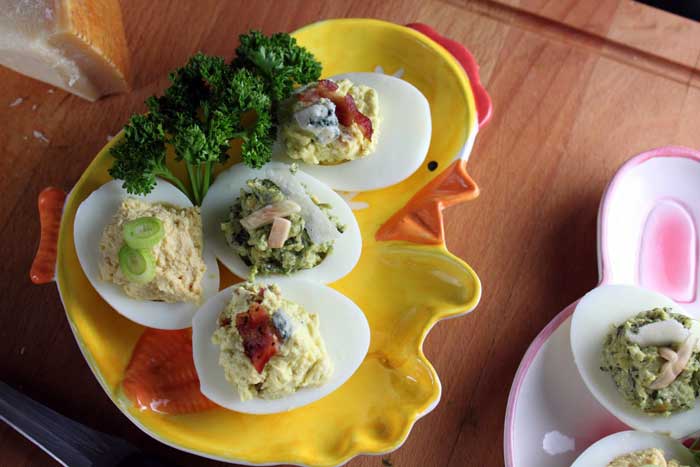
Like it or not, hard boiled egg season is upon us. Though short, this season is best known for bright and colorful eggs, happy screaming munchkins and overflowing buckets of smelly, green rimmed eggs.
My goal is to put an end to this season. Well, pink and yellow painted eggs – okay, I’ll deal. Crazed kids – sure, once a year is fine. مواقع القمار العالمية But the over-boiled, rubbery, stinky egg has got to stop!
Below I’ve detailed out exactly how to avoid this tragedy (cue the chirping birds and singing angels). Ok, now you have beautiful, edible hard boiled eggs – what do you do with them? Classic deviled eggs are back in style (did they really ever go out of style??) and I Fat ‘n Happy them up with pesto, wasabi powder and bacon and blue cheese.
Rejoice at this Fat and Happy ‘eggxcellent’ egg season, it will be gone faster than the candy coated malted milk balls you hide in your sock drawer.

How to cook the most perfect hard boiled eggs and then what to do with them after.
- Place your eggs in deep saucepan andfill with enough cold water to cover the eggs by about one inch
- Set the pan over high heat and bring just to a boil
- Turn the flame down to a slight simmer
- Simmer for 10 minutes
- Immediately place the eggs in a bowl with ice water for a minute or two
- Remove each egg, crack it leaving the shell on and place back in the ice water for about another five minutes
- Peel your gorgeous eggs and proceed below.
Bacon Blue Eggs
- 1 – 2 strips of crispy bacon, crumbled
- 2 tablespoons blue cheese
- 1 teaspoon mustard
- 2 tablespoons Greek yogurt
- Fresh black pepper
- Olive oil or water as needed
- 3 or 4 hard boiled eggs
Cut the eggs in half lengthwise. Mix together the yolks, bacon, cheese, mustard and yogurt. Drizzle in a little oil or water to reach desired consistency and add in fresh black pepper.
Taste test; add more or less cheese and bacon based on your preference.
Fill the whites with the bacon blue yolk mixture and top with a tiny crumble of blue cheese and a small bacon crumble. Enjoy the Bacon Blue Cheese Deviled Eggs!
Wasabi Eggs
- 1 teaspoon wasabi powder
- 1 teaspoon Soy sauce
- 1/2 teaspoon sesame oil
- 2 tablespoons Greek yogurt
- 2-3 hard boiled eggs
- 1 green onion
Cut the hard boiled eggs in half. Mix the yolks with the wasabi powder, soy sauce, sesame oil and yogurt; drizzle in water until desired consistency is reached.
Taste this; you may want a bit more powder for more heat or more soy sauce for a saltier flavor- Use my measurements as a guide.
Fill the whites with the yolk mixture and top with thinly sliced green onions. Enjoy your wasabi deviled eggs! شرح 1xbet
Pesto Deviled Eggs
These tasty devilish eggs get a kick from basil pesto. Either make a basil pesto or purchase one for ease.
This is just quick version, I used what I had in the house: almonds instead of pine nuts and a little mascarpone for creaminess. Have fun with it!
- 3-5 hard boiled eggs
- 3 tablespoons slivered toasted almonds or pine nuts, save a few for garnish
- 2-3 tablespoons Parmesan cheese, grated
- 1/2 cup fresh basil leaves (large handful)
- 2 tablespoons mascarpone or ricotta cheese
- 1 garlic clove, chopped
- Salt and pepper
- Water or olive oil as needed
Make the pesto first. Either in a mortar and pestle or in a small food processor blend the nuts, cheese, basil, mascapone and garlic while drizzling in the olive oil. Season with a bit of salt and pepper as needed.
Cut the eggs in half lengthwise, place the yolks in a bowl. قواعد لعبة البوكر Mix in the pesto and a few drizzles of water or olive oil until the yolk mixture reaches desired consistency.
Fill the whites with the pesto yolk mixture, garnish with a few slivers of toasted nuts and Parmesan cheese. Enjoy the basil pesto deviled eggs!
Tips and Techniques: These are loose recipes, taste and adjust according to your own preference. For a creamier filling use a food processor to mix the yolk fillings. I wanted a more rustic feel with a little texture so I mixed mine with fork; for the the pesto I used the mortar and pestle to keep a it little on the chunky side, too.
For more recipes, go to Monique’s blog: http://fatandhappyblog.blogspot.com/